Wednesday, March 21, 2007

A New Blog about LabVIEW OO

If you're looking for information about LabVIEW object-oriented programming from someone other than an NI employee, you might be interested in a new blog by Tomi Maila: EXPRESSIONFLOW. He promises to concentrate on "using of modern programming concepts in the framework of visual programming and LabVIEW."

Saturday, March 17, 2007

The Free LabVIEW Encyclopedia That Anyone Can Edit

LAVA has unveiled a new LabVIEW Wiki, described as "the free LabVIEW encyclopedia that anyone can edit."

I am very excited to see this milestone for the LabVIEW Community!

As Michael Aivaliotis put it, "This is the start of something huge!"

Sunday, March 11, 2007

LabVIEW UI Tip: the Resize Objects dialog

I recently pointed out the LabVIEW Resize Objects dialog to one of my coworkers and realized this little gem is probably often overlooked.

Have you ever had someone ask you to make all your buttons a certain number of pixels wide and tall?

When resizing an object in LabVIEW, you get a tip strip that shows the object's size, but it takes a steady hand to get a precise value. And resizing more than one object by hand gets tedious.

But with the Resize Objects dialog, it's super easy. Just select the objects you want to resize and choose the "Set Width and Height..." menu from the Resize Objects ring on the VI's toolbar.

You'll see the Resize Objects dialog, which allows you to change the width and height of the selected objects.

Just a few clicks and you're done!

[P.S. I just realized that I forgot to give my buttons proper labels before taking the screenshot. Just pretend the labels are the same as the text on the buttons, please. Thanks!]

Labels:

Thursday, March 08, 2007

LabVIEW Beta Program Announcement

If you are interested in participating in the LabVIEW Beta program, now is a great time to put in a request. Go to http://www.ni.com/beta to sign up.

We're just about to start the Beta for the release code named "LabVIEW Jupiter."

Wednesday, March 07, 2007

LabVIEW UI Basics: the Checkbox

I often advise people to "know your tools" before doing user interface design. Being familiar with the UI elements that your development platform (e.g. LabVIEW) provides will make it easier to select the right one for a particular application.

Towards that end, I'd like to survey the fundamental LabVIEW controls, starting with the checkbox.

Checkbox Control

Purpose

Allows the user to choose between two options, typically an "on/off" or "yes/no" style decision.

Appearance


Part List


Subtleties

When you click on the boolean text (with the operate tool), the checkbox changes state the same way that it does when you click on the box. The label, however, does not operate the control. I usually hide the label and change the "OFF/ON" boolean text to a description of the option, such as "Use default."

Strengths

This is a widely-used control, and very intuitive. It is compact, taking up relatively little space on the panel.

Weaknesses

The text with a checkbox describes only one of the two options. In some cases, the other state is obvious. If "Do not show this dialog again" is unchecked, it clearly means do show this dialog again. But in other cases, the other state may be ambiguous. What does it mean if "Display results in graph" is unchecked? Does that mean don't show the results, or show the results in a form other than a graph, or something else? In these cases, a checkbox is probably not the right control. I would consider using radio buttons instead.

Labels:

Sunday, March 04, 2007

LabVIEW UI Trick: Panel Wallpaper

Do you ever get tired of the gray panel background color?
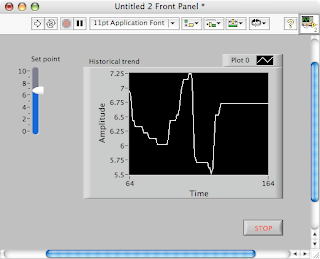
Before LabVIEW 8.20, you could put background images in VIs, but they got in the way while editing and you had to make sure they were just the right size.

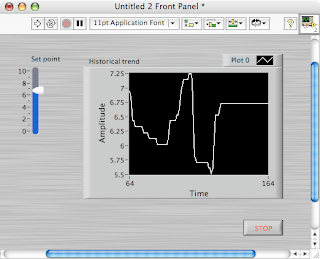
In LabVIEW 8.20, you can set wallpaper for your panel. Right-click on the scrollbar and select "Properties." (I know, this is an odd place for it, but we couldn't make it a right-click on the panel, could we?)

From the Pane Properties dialog, you can choose from several shipping Background images, or browse to your own. You can set the image to Stretch (grow to fill the panel), Center (stay at a fixed size in the center of the panel), or Tile (repeat the image to fill the panel).

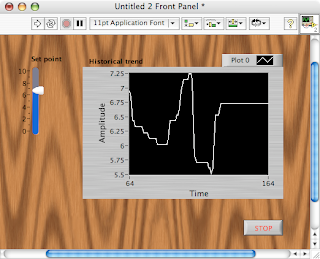
Here's our panel again, but with a brushed metal background:


And, in case you're wondering, the "Pane Properties" is not a misprint. For normal VIs, there is one pane that fills the panel, but by using the Splitter Bars, you can have multiple panes in a panel.

That's all for now. Have fun! But please don't go too crazy. Eye candy is fun where appropriate, but you don't want to make something ugly and difficult to use:

Labels: