Code Reuse through Classes
Before LabVIEW 8.20, code reuse primarily meant writing good subVIs. With LabVIEW 8.20, you can also reuse code with well-designed classes.
Let's look at the OO GSW example from my previous post. There are two kinds of code reuse demonstrated here: inheritance and delegation.
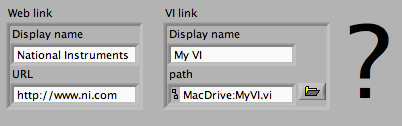
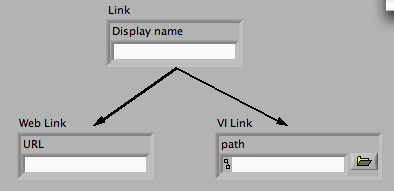
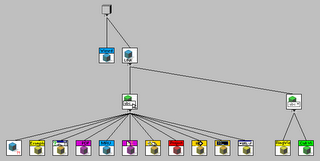 If you look at the LabVIEW Class Hierarchy window (found in the View menu), you can see that all the different link handlers inherit from a Link class. Making a common ancestor class allows us to do several things: put common data fields in the Link class private data; share common functionality in methods on the Link class; and define interfaces for dynamically dispatching on this hierarchy of objects (more on this last point in a future post).
Having a common ancestor class also allows us to create arrays where each element is a different class. That's right, that means having an array where each element is a different type! And because of dynamic dispatching, you can iterate through an array, call a particular method on each element, and dynamically call an appropriate VI to do that operation on that type of object.
Of course, you may notice that you actually get the ability to create arrays of different classes automatically. In the LabVIEW Class Hierarchy window, you can see that all classes in LabVIEW inherit from a common ancestor class. We call this class LabVIEW Object. It has no private data or methods, and you cannot edit it.
You may also notice, in the LabVIEW Class Hierarchy window, a second class that inherits from LabVIEW Object called ProjectWizard.
When you have certain modules (like Real-Time) installed, the Getting Started window changes. One of the links in the New section becomes a link to a module's New Project Wizard. Also, a Targets ring becomes visible in the lower left, which shows all the module project wizards available. Clicking on the new project link in the New section or selecting the corresponding item in the ring and clicking Go both do the same thing.
I designed my class hierarchy with two kinds of links: clickable text and ring items. In the module New Project Wizard case, there are links of each type that need to share functionality. Should I put the common data and methods in the ancestor class, Link? No, because then all the kinds of links that don't open project wizards would needlessly share them.
Instead, I create a helper class that launches project wizards, and I put an object of that class in the private data of both ProjectWizardClickableText and RingItemProjectWizard. This is called delegation.
As I've said before, there's lots more to talk about on this example, but I want to keep each post short, so that's all for today. Thanks for reading!
Let's look at the OO GSW example from my previous post. There are two kinds of code reuse demonstrated here: inheritance and delegation.
 If you look at the LabVIEW Class Hierarchy window (found in the View menu), you can see that all the different link handlers inherit from a Link class. Making a common ancestor class allows us to do several things: put common data fields in the Link class private data; share common functionality in methods on the Link class; and define interfaces for dynamically dispatching on this hierarchy of objects (more on this last point in a future post).
Having a common ancestor class also allows us to create arrays where each element is a different class. That's right, that means having an array where each element is a different type! And because of dynamic dispatching, you can iterate through an array, call a particular method on each element, and dynamically call an appropriate VI to do that operation on that type of object.
Of course, you may notice that you actually get the ability to create arrays of different classes automatically. In the LabVIEW Class Hierarchy window, you can see that all classes in LabVIEW inherit from a common ancestor class. We call this class LabVIEW Object. It has no private data or methods, and you cannot edit it.
You may also notice, in the LabVIEW Class Hierarchy window, a second class that inherits from LabVIEW Object called ProjectWizard.
When you have certain modules (like Real-Time) installed, the Getting Started window changes. One of the links in the New section becomes a link to a module's New Project Wizard. Also, a Targets ring becomes visible in the lower left, which shows all the module project wizards available. Clicking on the new project link in the New section or selecting the corresponding item in the ring and clicking Go both do the same thing.
I designed my class hierarchy with two kinds of links: clickable text and ring items. In the module New Project Wizard case, there are links of each type that need to share functionality. Should I put the common data and methods in the ancestor class, Link? No, because then all the kinds of links that don't open project wizards would needlessly share them.
Instead, I create a helper class that launches project wizards, and I put an object of that class in the private data of both ProjectWizardClickableText and RingItemProjectWizard. This is called delegation.
As I've said before, there's lots more to talk about on this example, but I want to keep each post short, so that's all for today. Thanks for reading!
Labels: labvoop
posted by Christina at
8:06 AM
2 Comments
![]()
![]()